This article demonstrates the technique I use for creating full-width featured images using Thesis 2.1. Images are displayed above the headline and span the entire width of the post content box.
I chose to display my featured images above my post headlines because I feel it helps break up my content nicely and introduces the article with a cool graphic.
You can place your Thesis Post Images wherever you like, this tutorial places them above the headline because that’s what I did on my site.
Depending on your current design, the code mentioned in this article may need minor tweaking to fit perfectly with your site.
I hope you can use this tutorial to spice up your Thesis site a bit with nicely formatted featured images. Be sure to leave any questions or concerns you have in the comments section after the article.
Create a New Container with a Custom Class
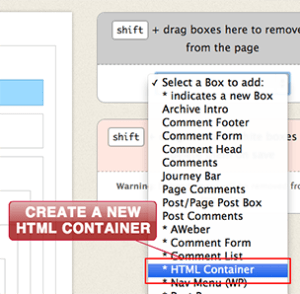 fraThe first thing you are going to do is go to your Thesis Skin Editor and add a new HTML Container box from the drop-down menu on the right.
Name the new container whatever you like. For the tutorial we will name our container ‘Thesis Featured Post Image’.
After naming the box, set a custom HTML class to target in your CSS.
I used the class thesis-feat-img for this demonstration but you can choose whatever you like.

We have now finished creating our featured image box. Next we will add it to our templates.
Add the New Container to Each Template
Now that our image container has been created and set with an HTML class, we need to add it inside our templates.

Shift + drag the ‘Thesis Featured Post Image’ container to the inside of your ‘Post Box’ container and above the ‘Headline Area’ container. Do this for each template you wan’t the featured images to appear.
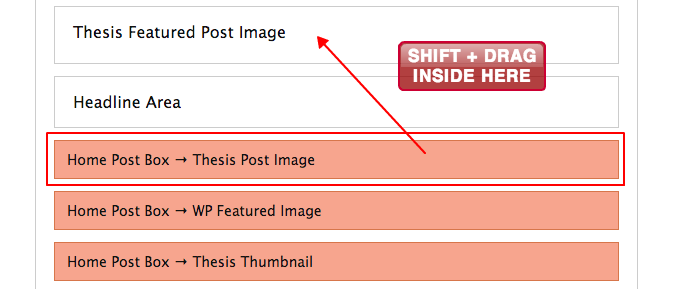
After adding the container to your page templates, locate the ‘Thesis Post Image Box’ > Shift + drag it into your ‘Thesis Featured Post Image’ container.
Look within the tray if you can’t see your Thesis Post Image Box in the skin editor.
Activate to Display Thesis Featured Images
The next step is making sure you have ‘Thesis Post Images’ activated within your skins content options.
Navigate to the content section of your Thesis Skin Options from the Skin > Content tab. Once there, select the ‘Post Box’ or ‘Post Output’ tab and make sure ‘Thesis Post Images’ are checked for display.

This option activates the use of Thesis Post Images within your content and adds a meta-box to your post editor screen for uploading images.
Create Variables or Add Custom CSS Code
These options may vary slightly depending on the current layout of your website.
For this tutorial, I am using options that work with the Thesis Classic Responsive skin. Your options will be the same or similar so play around with them if they don’t mesh perfectly.
Add the following code to your Custom CSS section or use it to create a new variable within your HTML editor.
/* Thesis Featured Image & Container */
.thesis-feat-img {
    margin: -26px -26px 0;
}
.thesis-feat-img .post_image {
    margin-bottom: 1em;
    width: 100%;
    border-bottom: 1px solid #DDD;
}
The area you may need to adjust a bit is the margin of our thesis-feat-img class. The previous code will remove the padding of your Post Box to display a full width image.
Add Thesis Featured Image to Post & Test
The last thing you need to do is create a new post or go to a post you have created and find the ‘Thesis Post Image’ meta-box for uploading your featured image.
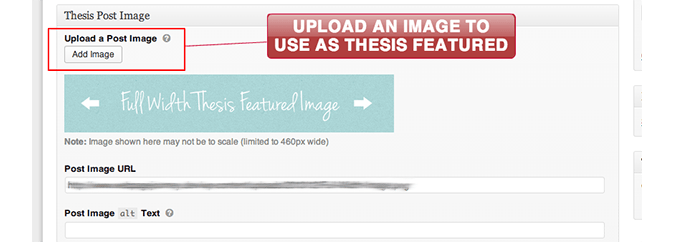
Simply add a new image with the upload button included inside the meta-box and make sure the URL is added to the input area.
That’s it, save your post, click preview and see if all went according to plan! You should see something like this if done correctly:
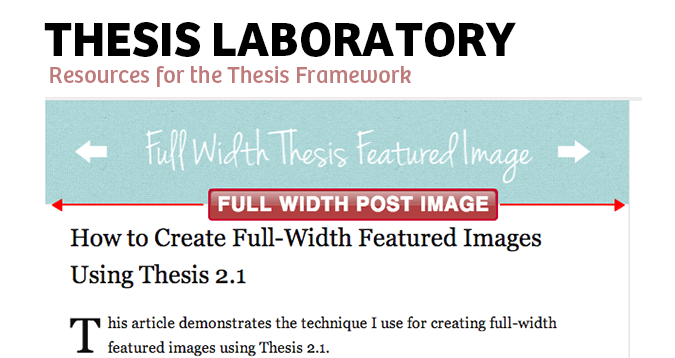
Reminder – you may have to tweak your CSS if the image is not fitting flush with your post box.
A Final Word for Readers
I hope you were able to find some use out of this article. If you are having trouble getting your full-width featured images to work, leave a comment below with a little information about the issue.
Otherwise, leave your comments, questions or concerns about anything else you would like to discuss.
Best of luck with all of your designs and hope to see you back again soon! Cheers.

